
Why would you want to photograph your products? For catalogues, manuals and folders, or perhaps for your website? Or, you may want to vignette the product and put it in another, perhaps synthetic environment.
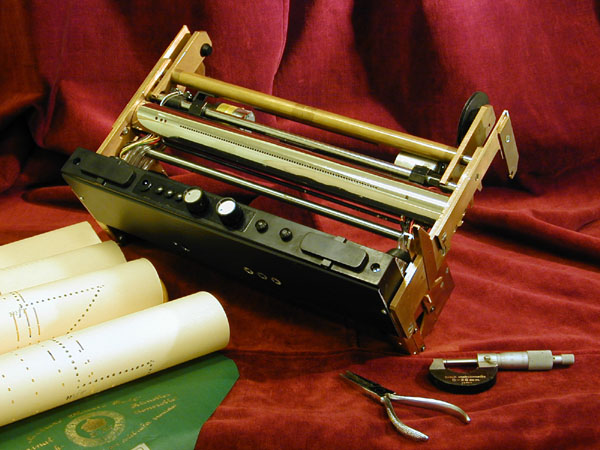
The product must be presented from its most favourable perspective, like the one to the left, a custom designed adapter for mounting inside player pianos. A very special product that has to be presented to a very special audience, where elegance and precision is the only thing that counts (hence the velvet and the micrometer). A great picture that breaths of elegant lounges and shimmering gold. To the right, not at all a commission from IG Niederegger in Luebeck but because I got the inspiration, the yummiest chocolate picture I have ever made. Delicious colours and a luxurious touch, befitting the world's best marzipan manufacturer.
Sometimes Photos are not Enough |
Plain photos are usually not enough for handbooks and assembly instructions. They contain far too many details, and what you really wanted to show may be hidden or drowned by other information. If the picture is of substandard quality, the situation is even worse.
By vectorising the picture and emphasizing the important, clarity is gained. And arrows and centre lines will be much easier to see. The picture simply becomes much more effective. Using the right colours on objects and arrows, it is possible to emphasize the workflow or how objects are interdependent.
Example |
 The pictures
in this article are part of an instruction of how to mount a hard disk in a Digital Equipment computer. We'll begin
with the original photo, made in my kitchen, to illustrate the problem with straight, unretouched photos. There
is stuff lying to the sides, a lot of interfering cabling and also a lot of loose odds and ends in the computer
that shouldn't be there.
The pictures
in this article are part of an instruction of how to mount a hard disk in a Digital Equipment computer. We'll begin
with the original photo, made in my kitchen, to illustrate the problem with straight, unretouched photos. There
is stuff lying to the sides, a lot of interfering cabling and also a lot of loose odds and ends in the computer
that shouldn't be there.
 Just
putting captions in the picture may be a solution, although not a very elegant one. The interfering details are
still there. Photoshop is not suited for this kind of representations. One could perhaps have made a simple vignette,
but it wouldn't have helped.
Just
putting captions in the picture may be a solution, although not a very elegant one. The interfering details are
still there. Photoshop is not suited for this kind of representations. One could perhaps have made a simple vignette,
but it wouldn't have helped.
 The
next image shows the photo completely removed and replaced by a vector drawing. It is now completely clear in what
order the modules should go into the computer, and there is no doubt where the screws should go. Cabling and other
irritating details have been removed. There is really no need for language in the picture.
The
next image shows the photo completely removed and replaced by a vector drawing. It is now completely clear in what
order the modules should go into the computer, and there is no doubt where the screws should go. Cabling and other
irritating details have been removed. There is really no need for language in the picture.
 If
there is no need for colour, or if there are still too many details, a black and white drawing may be the solution.
In this illustration a maximum of detail has been removed, the important lines have been made thicker, et cetera.
All mounting holes have been coloured black. You can't make it much clearer than this.
If
there is no need for colour, or if there are still too many details, a black and white drawing may be the solution.
In this illustration a maximum of detail has been removed, the important lines have been made thicker, et cetera.
All mounting holes have been coloured black. You can't make it much clearer than this.
